.png)
Using Stone to Improve Drainage
- planttasticcooking
- Jul 5, 2022
- 3 min read

Updated: Jul 5, 2022
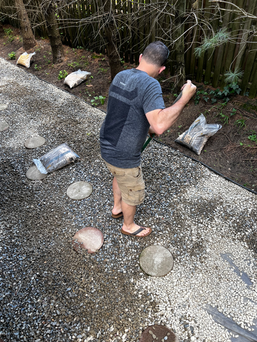
One of the major challenges at Amber’s house is a drainage issue in the backyard. This was not a flooding issue, but instead, an issue of dampness and a lot of standing water. These issues prevented plants from flourishing and created a huge issue with mosquitoes. It got so bad that we could barely use our yard during the summer months. We didn’t want to use spray constantly because of the damage to other life and because we have little babies running around. Instead, we completed a project under our deck to improve the drainage using stone.

This project took us a total of three days to complete, with two people working on it. It has only been a week and we are already seeing the benefits of it. It was well worth the time and effort. Hopefully the tips below will help if you are experiencing similar challenges.


Tip One - Figure out where the water wants to go naturally.
The first thing you need to consider is where the water in your yard wants to flow. It can be a fruitless endeavor to fight the natural flow of water in your yard. With a project that takes a lot of time and energy, you want to make sure it has longevity. For us, we live on a hill. The water naturally wants to run down the hill. This means that behind the house, the water was hitting the back of the house and then just sitting there. We simply needed to create a path around the house so that the water was moving instead of just sitting.
Tip Two - Tamp down and shape your ground.
Next, make sure that you tamp down your soil really well to avoid runoff and movement that will ruin the hard work that you put in. Ideally, use a tamping tool to make sure that the ground is packed tight before you add your stone. In addition, this helps shape the ground to create the natural flow of water that you want. For us, we used sand to create a triangle shape in the middle of the deck. This allowed for the water to flow around the house and down the hill like we desired.
Tip Three - Use garden fabric to encourage water flow and discourage plant growth.
After tamping down the soil, we used geotextile fabric secured with garden staples to further improve drainage and to ensure that we wouldn’t have unwanted plants growing up through the stone. The fabric helps water move across and down the hill, versus just sitting in unwanted places. In addition, the care is so much easier with less weeding needed under our deck.


Tip Four - Make sure to place at least two inches of stone.
Once the fabric was down, it was time to put in the stone. This was hard, but enjoyable work. It took us about a day and a half to move over 2.5 tons of stone to cover under our deck and a few feet of the backyard. We wanted to make sure that we had at least two inches of stone to provide good coverage, good drainage, and just look good! Since we extended our project, we had to buy some extra bags of stone. We weren’t able to do the same stone unless we ordered another truckload. We got a different type of river rock and love the two-tone look. However, if this is not your style, make sure you round up when you order your stone.

Tip Five - Create a small French drain to provide extra drainage in strategic places.
We ended up adding a small French drain, about two feet by three feet and one foot deep. We used larger rocks in this section to add another place where water could go without creating standing water in unwanted places. This was an easy addition to our project and added a little extra assurance. Please note that we do not have a flooding issue, which is why a small French drain works for us.


Hopefully these tips help if you are considering using stone to improve drainage. We had a lot of fun working on this project, besides for when we kept accidentally hitting our heads on the deck above us. Check out the below YouTube video if you would like to see our project in action!


Comments